Vaulting replicates restore points contained in a local store to cloud storage. A customer may wish to use a network share for the cache drive used by the software's vaulting feature in the event no appropriate local disk exists. Build 9.0.3094.1 and newer builds of the software permit the cache to reside on a network share, such as an SMB share on a NAS device, or a Windows server share.
Note well: Any update to the software or uninstall and reinstall of the software reinstalls the DATASTOR Shield Cloud Gateway service using a local system account, resetting step 6 of the document. The DATASTOR Shield Cloud Gateway service must run using a log on account with permissions to the share, otherwise the Cloud Gateway service will not be able to upload cached data to the cloud. The end user must set the service to use an appropriate log on account after an upgrade or reinstallation of the software when vaulting is configured to use a network share.
To configure a network share as the cache drive, follow the steps below. It is assumed that the share exists and the user account that runs the vaulting task has been granted read/write access to the share. The build number of the software must be at least 9.0.3094.1 to support using a share as the cache drive.
- In Archive Manager, click the Storage folder in the left pane, then 'Configure Vaulting' in the right pane. Select the desired local disk, encryption passphrase, and owner id on each screen. The cache drive will be updated to use a reparse point in a later step. Finish the wizard.
- On the Archive Manager server, open a command prompt as administrator.
- Use mklink to create a reparse point named Cache on the local drive, specifying the network share as its target. The syntax for the command is mklink /d <link> <target>. So, if the reparse point is to be defined as a folder at path D:\Cache, and the network share is at UNC path \\NAS1\Share1, the command to create the reparse point would be:
mklink /d D:\Cache \\Nas1\Share1Adjust the command for your local disk (E.g. C:\Cache, D:\Cache) defined in step 1 and adjust the UNC path to your share. Do not create a Cache folder prior to running the command or the command will fail. Once mklink executes, File Explorer will show a Cache folder on your local disk that links to the share.
3. Open regedit. To open, type regedit into the search bar in the toolbar and select it from the results.
4. Navigate to HKLM\Software\DATASTOR\ArchiveIQ. Right click in the right hand pane and select New > String Value.
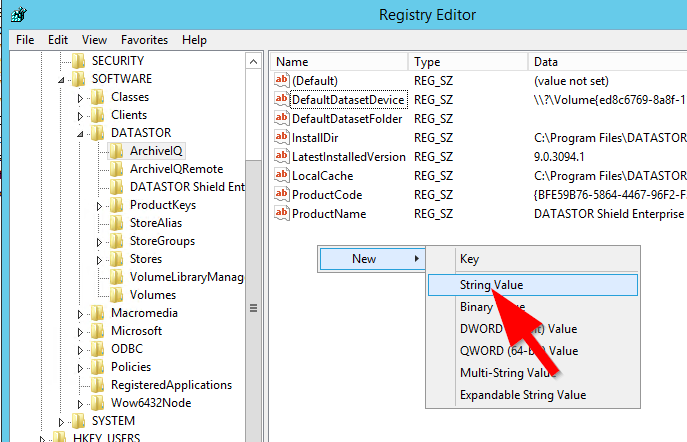
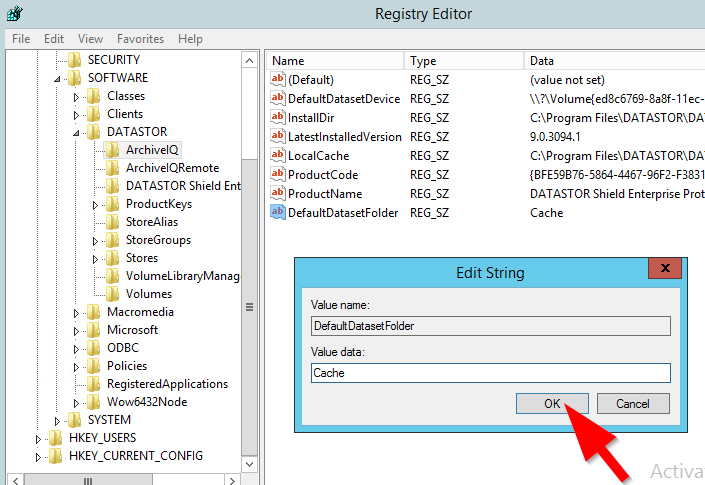
Name the entry DefaultDatasetFolder (case sensistive) and hit enter. Then, double click the DefaultDatasetFolder entry to edit the Value data: field. Enter Cache and click OK.
5. Check your cache drive setting. In Archive Manager, click on the Storage folder, then 'Configure Vaulting...' in the right pane. On the Cache Drive page, confirm the path has been updated to include the Cache reparse point.
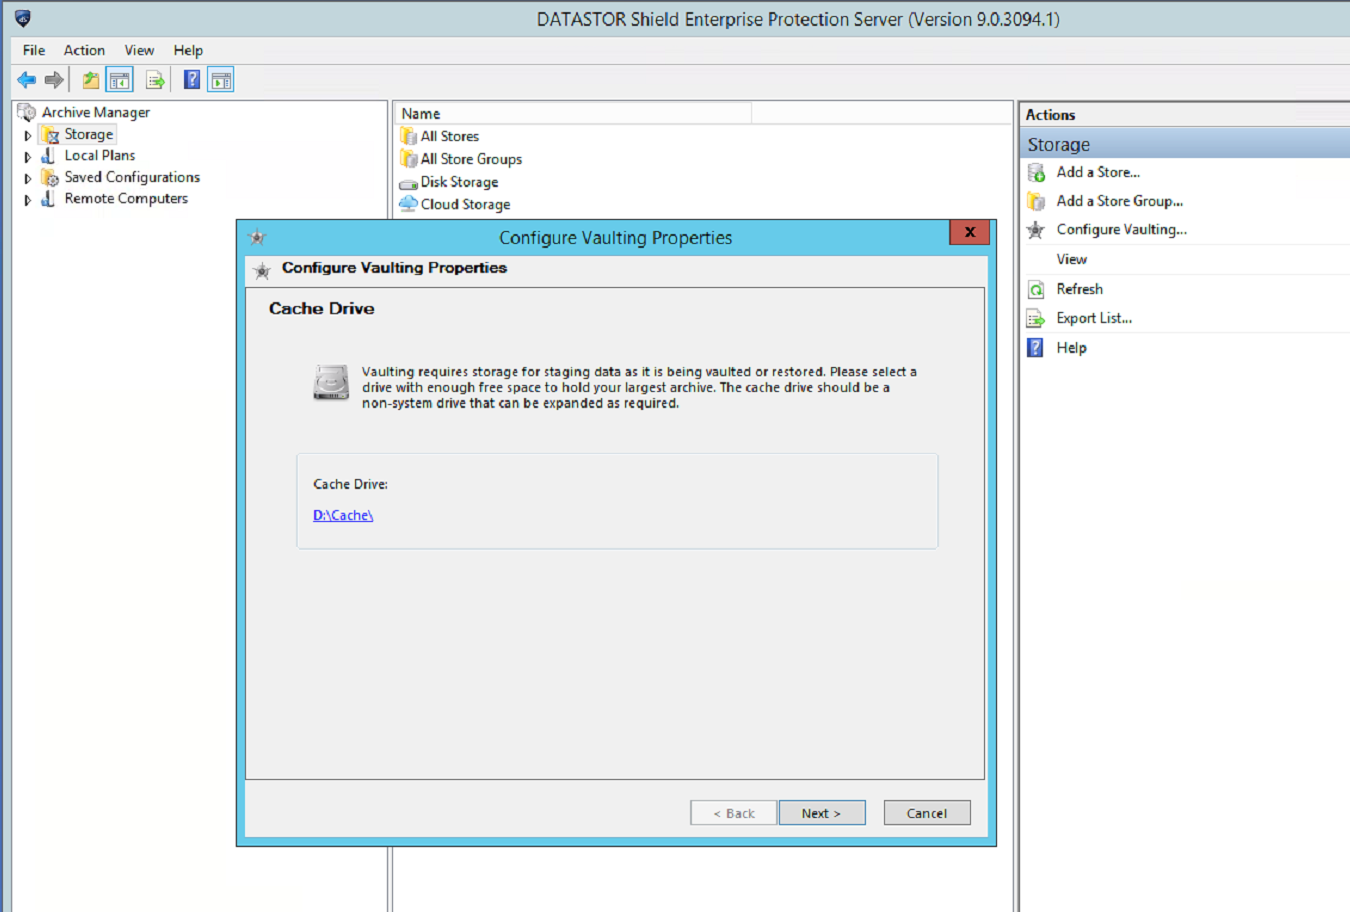
If the Cache Drive: field does not include the Cache folder, click on the blue link and select the same drive letter again. The Cache Drive: field should then update to include the path to the Cache folder created in step 3. Once confirmed, click the Next button on each window until you finish the wizard, keeping the other existing settings.
6. Open the services console in Windows Administrative Tools. Find the DATASTOR Shield Cloud Gateway service and double click it to open Properties. On the Log On tab, select the This account: radio button. Enter the backup service account and password. Click OK to save.
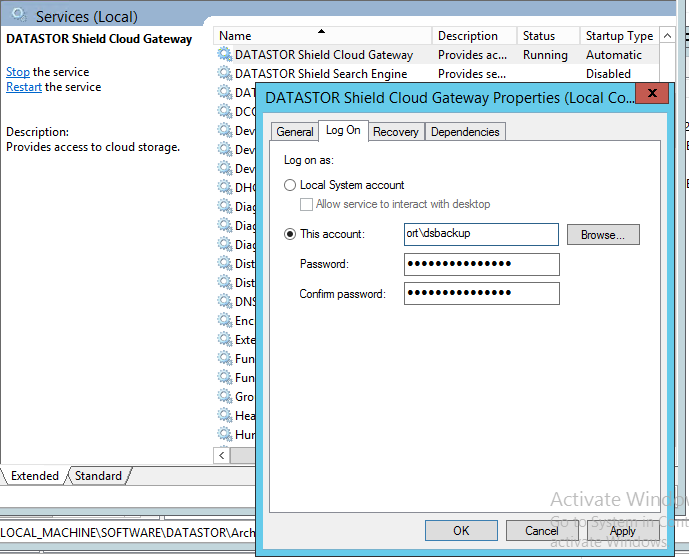
The account will be granted the user right to log on as a service, if it is not already a member. Restart the service.
If not already configured, edit the share permissions to grant the backup service account read/write access to the share. The account must also be a local administrator if this was not already configured.
You can then proceed to create a vaulting task and the software will use the defined cache drive.